Categories
Technology

The power of Ubuntu – showing dynamic messages in your desktop background!

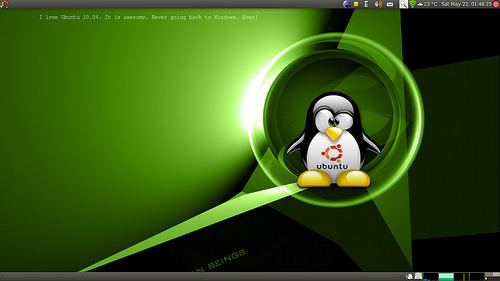
I worked on this cool hack to dynamically show Twitter messages embedded into the desktop background. The basic idea is to have some dynamic text (which could be fetched from the web) embedded in an SVG image, which is set as the desktop background. The SVG image contains the actual wallpaper that we intend to use.

[ad name=”blog-post-ad-wide”]

Here are the steps:

  1. We first start by creating an SVG template file called wall-tmpl.svg with the following contents and saving it in the Wallpapers directory (let’s say it is ~/Theme/Wallpapers):
    <?xml version="1.0" encoding="UTF-8"?>
    <!DOCTYPE svg PUBLIC "-//W3C//DTD SVG 1.0//EN" "http://www.w3.org/TR/2001/REC-SVG-20010904/DTD/svg10.dtd" [
    <!ENTITY ns_imrep "http://ns.adobe.com/ImageReplacement/1.0/">
    <!ENTITY ns_svg "http://www.w3.org/2000/svg">
    <!ENTITY ns_xlink "http://www.w3.org/1999/xlink">
    ]>
    <svg xmlns="http://www.w3.org/2000/svg" xmlns:xlink="http://www.w3.org/1999/xlink" width="1280" height="1024" viewBox="0 0 1280 1024" overflow="visible" enable-backgroun
    d="new 0 0 132.72 127.219" xml:space="preserve">
    <image xlink:href="~/Theme/Wallpapers/-your-favorite-wall-paper-" x="0" y="0" width="1280" height="1024"/>
    <text x="100" y="200" fill="white" font-family="Nimbus Mono L" font-size="14" kerning="2">%text</text>
    </svg>
  2. Next we create a script to fetch the most recent Twitter message and then embedding it in the image. The script is called change-wallpaper and is placed in the bin directory. It has the following:
    text=`python -c "import urllib;print eval(urllib.urlopen('http://search.twitter.com/search.json?q=ubuntu&lang=en').read().replace('false', 'False').replace('true', 'True
    ').replace('null', 'None'))['results'][0]['text'].replace('\!','').replace('/','\/')"`
    cat ~/Theme/Wallpapers/wall-tmpl.svg | sed "s/%text/$text/g" > ~/Theme/Wallpapers/wall.svg
  3. We then add the following entry to crontab to fetch Twitter messages every minute:
    # m h dom mon dow command
    * * * * * ~/bin/change-wallpaper
  4. Run the script once, it will create a file called wall.svg in your Wallpapers directory. Set this as your desktop background and watch the background change every minute!

You could get very creative with this. You could have your calendar reminders embedded directly into your desktop background or you could have dynamically fetched background images with your own random fortune quote. The possibilities are enormous!
Categories
Technology World Wide Web

Why Google AppEngine still sucks

Last June, when I built the Twitter Trending Topics app using Google AppEngine, I had mentioned quite a few issues with the application building in Google AppEngine. After giving it about 9 months to mature, I thought I will take a look at it again with a fresh perspective on where it stands.

The first thing that I wanted to try was to revive my old application. The application has been inactive because it has surpassed the total stored data quota and I never managed to find time to revive it.

One of the biggest issues that I mentioned last time, was the ability to not be able to delete data from the application easily. There is an upper limit of 1GB on the total stored data. Considering that the data is schema-less (which means that you need more space to store the same data when compared to Relational Databases), this upper limit is severely restrictive when compared to the other quota limits that are imposed. There were about 800,000 entries of a single kind (equivalent of tables) that I had to delete!

So I started looking for ways to delete all the data available and came across this post. I decided to go with the approach mentioned here. The approach still seems to be to delete data in chunks and there is no simple way out. The maximum number of entries allowed in a fetch call is 500, which means I require 1600 calls to delete all the data.

Anyway, so I wrote a simple script as mentioned in the post above and executed it. I experimented with various chunk values and saw that 300 was the size that worked optimally; anything more either seemed to take a lot of time or actually timed out.

Here is the code that I executed:


from google.appengine.ext import db
from <store> import <kind>


def delete_all():
   i = 0
   while True:
      db.delete(<kind>.all().fetch(300))
   i = i + 1
   print i

saved this file as purger.py and executed it as:

$ python appengine_console.py twitter-trending-topics
App Engine interactive console for twitter-trending-topics
>>> import purger
>>> purger.delete_all()

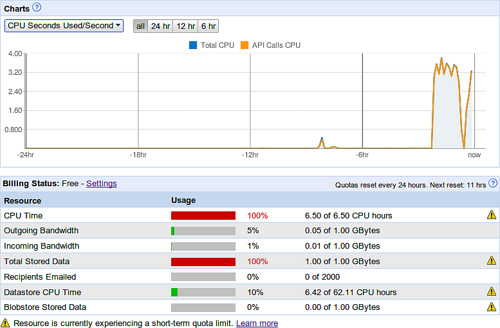
A seemingly simple script, but after about a couple of hours of execution (after having deleted roughly 200,000 entries), I started seeing a 503 Service Unavailable exception. I thought this was to do with some network issues, but realized soon that this was not the case. I had run out of my CPU time quota!

To delete 200,000 entries the engine had taken up 6.5 CPU hours and this it managed to do in less than 2 hours! It had, according to the graphs, assigned 4 CPU cores to the task and executed my task in the 2 hours. At this rate, it will take me 4 days to just delete the data from my application. The Datastore CPU time quota is 62.11 hours but there is an upper cap of 6.5 hours on Total CPU time quota – the Datastore CPU Time quota is not considered separate. I am not sure how this works!

[ad name=”blog-post-ad-wide”]

As seen in the screenshot above, the script executed for about 2 hours before running out of CPU. There was no other appreciable CPU usage in the last 24 hours. Considering that there was no other task taking up CPU, the 6.42 hours of Datastore CPU time seems to be included in the 6.5 hours of Total CPU time. So how am I supposed to utilize the rest of the 55 hours of Datastore CPU time?

I am not sure if I am doing something wrong but considering that there are no better ways of doing things here are my observations:

  • It is easy to get data into the system
  • It is not easy to query the data (there is an upper limit of 500 and considering that joins are done in code, this is severely restrictive).
  • There is a total storage limit of 1GB for the free account
  • It is not easy to purge entities – the simplest way to delete data is to delete them in chunks
  • Deleting data is highly CPU intensive – and you can run out of CPU quota fairly quickly.

So what kind of applications can we build that is neither IO intensive nor CPU intensive? What is Google’s strategy here? Am I missing something? Is anything wrong with my analysis?

Categories
Technology

A review of the Sony Digital Reader (PRS 600BC)

Update (Sep 29, 2011): With Amazon having released quite a few devices, more recently, the Kindle Fire, this post seems very old.

After having used the Sony Digital Reader Touch Edition (PRS600BC) for almost 2 months now, I think I am ready to give a comprehensive review of the features of this wonderful device.

When I bought the Sony Reader (PRS600BC), I didn’t put much thought into it. I compared it only to the other well-known reader at the time – the Amazon Kindle – and decided without doubt that I am going for the Sony reader. Frankly, I didn’t research for other options and I wasn’t even aware of the other readers in the market.
So if you ask me, how does this compare to, say the Nook, or other digital readers in India that use e-ink or the tons of other Chinese digital readers that can be hacked, I don’t have an answer. What I can do tell you is why I made this choice and what I feel after having used it for a couple of months.

So let’s begin with the choice: Between the Sony readers and the Kindle, the choice for me was obvious. Even if the Kindle was dirt cheap and had better look and feel and amazing features, I would still go with the Sony reader at this point in time, for the simple reason that the Sony reader supports EPUB, and the Kindle does not (read the disclaimer below). As the DRM debates are on, I felt that the Amazon Kindle does not have EPUB support and I was not sure what documents would work without issues on the Kindle and what would not. It made no sense to me to have to pay Amazon (howerver few a cents) or let Amazon decide what is and what isn’t appropriate to upload into the Kindle (read disclaimer below). On the other hand, the Sony reader has no such reservations – connect the reader, allow the device to mount, drag and drop your documents and you will be reading your book on the reader in less than a minute. Now, when I talk about open formats, people automatically assume that it means I can copy pirated versions of books into the reader and that’s the reason why the Sony reader is favored, but I think the reason is slightly different. Let us look at it in a little more detail. Here is the definition of open format from openformats.org: We will say that a file format is open if the mode of presentation of its data is transparent and/or its specification is publicly available.Why is it so important? Well, the fact that the reader supports open formats means that I can think of tons of uses for my reader. I can use it not only to read my books, but I can also create documents in the format that it supports and then upload them into the reader. What the document is – is totally up to me to decide. For example, suppose I find an interesting website/blog which has some content that I intend to read on my reader, I can just fetch the website contents using wget, and then use html2epub to convert them into an EPUB document and upload it to my reader in minutes. Is it as simple in a Kindle? How is the support in Linux? I was not sure. You may now say, “But that’s for geeks; how about the non-geeks? How do they benefit by going with the Sony reader?”. This is where tools like Calibre come into picture. Calibre provides an easy interface for users to sync their documents and news feeds with the reader. It also has the feature of syncing Google Reader content with your reader. All this is possible, because of one decision that Sony made – to support open formats. So for me, the decision was simple – if the reader does not support open formats I would not go with it. Enough of the comparison, so what should I expect in a reader? A reader is an equivalent of a book. It is designed to as closely match a real book as possible. So expect any feature that you would have in a regular book and you wouldn’t be disappointed. Note taking, ability to bookmark pages etc are natural to expect in a reader. If your expectations however are closer to that of a cell phone and you say, “Does this play movies? Does it record video?”, my only answer is, “Cummon guys, it’s a reader!” Of course, there are certain things that you could expect in a e-reader, for eg: bluetooth that allows a simple sync of documents. The reader has the ability to play music (or I would say play audio-books), and also display photos, but I am not a big fan of it – I always believe in buying a device which does one thing well – the reader is meant to do everything with e-books, and do it well. So now to the actual features and what I liked and what I disliked: The pros:

  • Boots in less than a second and takes you back to where you left – the Sony reader remembers where you stopped reading a book and takes you to the same page the next time you open the book.
  • The touch screen is cool and extremely useful – the coolest use of this is I can double-tap on any word and its meaning appears in the bottom of the screen. I am so used to this feature now that I sometimes find myself tapping a word in an actual book and expecting its meaning to appear in the bottom! (I am not kidding). Another use of this is to take notes – just bring up the note taking feature and just select the words using the stylus. You can even use the draw mode to circle words and then write your note next to it! Double-tap the right corner of the screen and it bookmarks the page.
  • The battery backup is amazing – I am not sure how many times I have charged the reader in the last 2 months, but I can tell you its not a whole lot.
  • The reader is able to render PDFs with images and size does not seem to be an issue – I have tried uploading PDFs of 150MB and more and the reader effortlessly rendered it.
  • The reader auto-flows documents at various zoom sizes – once you get comfortable at a certain font size, you can ensure that every document you read is of the same font size so that you can read documents extremely fast.
  • Enough space – with 512MB of memory, the reader has sufficient space to store tons of books. But if you think you are short of space, you have the option of popping in a SD card. I am yet to find the need to do that.

The cons:

  • The contrast could have been better – a common complaint with Sony readers. The e-ink technology seems to increase the contrast with light so the contrast is a problem in low light.
  • The glare – another common complaint with Sony readers – the touch screen creates a glare and so can hurt your eyes if not held the right way. It took me some time to get used to this but I don’t see it as a problem now.
  • No backlight – this is a problem which has been solved in the next version of the reader, Sony Digital Reader – PRS700BC, but the PRS 600 BC does not have a backlight making it tough to read books in low light.
  • The touch screen makes the reader look like a page behind a glass – making it look unnatural.
  • The music player seems to suck up a lot of power.
  • Software bugs: Considering that it has been only 2 months since I bought the reader, I have run into quite a few bugs already. Here are a few:
    1. The most disturbing one of all is the reader seems to reboot when it runs into an issue in some EPUB documents. Sometimes it just hangs and you need to hard-reset the reader and a couple of times even do a catastrophic failure recovery. I am not sure if the issue is with the reader or the document converter, but I would expect the reader to not fail horribly in any case.
    2. The dictionary does not work on some words and there is no way to look up some word in the dictionary except to tap on some other word, bring up the dictionary and then change the word. I think the Sony reader requires more usability tests.
    3. Tapping on a word in the dictionary should take me to the meaning of that word – many a times I find myself not knowing the meaning of some word in the meaning provided. And the only way for me to look this up is to remove the current word and look up the new word manually.
    4. The note format is confusing – the notes are stored as XML documents, but the format that is used to identify the words is confusing. I was not able to decode it.
    5. Usability issues with images in documents: The reader is excellent for reading novels but falls a little short of expectations when it comes to reading research papers with images and equations in them. The reader does render the document pretty well, but I have seen cases where images are not rendered or it is difficult to read. There is a zoom feature which allows you to zoom into documents and then drag the document around but this is quite unusable because of the delay in rendering.

All in all, I would say, Sony has made an excellent effort at building an e-reader. It would take another couple of releases before we can expect it to mature, but I would say I am pretty content with what it already has and I don’t mind waiting a couple of years before upgrading. Disclaimer: A few of these words may already be outdated considering that Kindle may support drag and drop of documents and have some form of ePub support (or a official converter) soon. Further, the DRM debates are still on, discussing trade-offs between piracy and usability. Update: Here is a better and more accurate description of why I am reluctant to buy a Kindle: Amazon’s Kindle Swindle.

Categories
Technology World Wide Web

Google Reader – Mark Until Current As Read

I am an ardent feed consumer. I easily have over 300 feeds in my Google Reader and read them whenever I get a chance. The feeds include technology blogs, photography blogs, local news, startup blogs, blogs by famous people, blogs that help me in my projects etc.

It’s just not possible for me to visit every feed category every day, so I frequently see some of these categories overflow with posts.

Now I know there are extensive blog posts which describe how to better manage feeds and to cut down on information overload. But as we all know there is no simple solution.

So here I was using Google Reader and just skimming through the posts when I came across this need.

Suppose a feed has about 100 unread posts and I have skimmed through half of them, and read one in between that I thought was interesting, I am now left with quite a few posts on top of my read post, that I am not interested in reading but want to mark them as read so I don’t need to see them again. Would it be possible to mark these as read leaving the rest untouched?

The recent changes to Google Reader provide one option – Mark all entries older than a day, week or month as read. But this does not exactly serve the purpose.

I ended up hacking a Greasemonkey script to do exactly what I wanted.

Here is how the script behaves:

Just press Ctrl+Alt+Y and the script will mark all entries above the current read entry as ‘read’. Ctrl+Alt+I will mark all entries below the current entry as read – for people who read backwards. 🙂

Added benefits:

  • This also works with search results in Google Reader.
  • The script works with entire folders, so you can skim through all posts in a folder marking the ones you have skimmed as read.

How it works:
The script uses the css class names to determine which posts are unread above (or below) the current post. Once it obtains this list, it simulates a click on each of these posts and thereby marks them as read. Simple as that!

This script is part of the Better GReader extension and has featured in Lifehacker.

In order to install the Google Reader – Mark Until Current As Read script, visit this site.

Categories
Technology

Getting Reliance (Huawei) USB Data Card to work in Ubuntu 9.04 (Jaunty)

In order to get Reliance USB Data Card to work in Ubuntu, follow these steps:

  1. Make sure wvdial is installed
    sudo apt-get install wvdial
  2. Add the device configuration to your /etc/wvdial.conf

    Replace <phone-number> with your 10 digit Reliance connection number.


    [Dialer Defaults]
    Phone =
    Username =
    Password =
    New PPPD = yes


    [Modem0]
    Modem = /dev/ttyUSB0
    Baud = 115200
    SetVolume = 0
    Dial Command = ATDT
    Init1 = ATZ
    FlowControl = Hardware (CRTSCTS)


    [Dialer cdma]
    Username = <phone-number>
    Password = <phone-number>
    Phone = #777
    Stupid Mode = 1
    Inherits = Modem0

  3. Run wvdial
    sudo wvdial cdma

    You will see some output like this:

    ~$ sudo wvdial cdma
    --> WvDial: Internet dialer version 1.60
    --> Cannot get information for serial port.
    --> Initializing modem.
    --> Sending: ATZ
    ATZ
    OK
    --> Modem initialized.
    --> Sending: ATDT#777
    --> Waiting for carrier.
    ATDT#777
    CONNECT 230400
    --> Carrier detected. Starting PPP immediately.
    --> Starting pppd at Sat Jul 11 22:56:19 2009
    --> Pid of pppd: 4299
    --> Using interface ppp0
    --> pppd: ????[18][18]m X[19]m
    --> pppd: ????[18][18]m X[19]m
    --> pppd: ????[18][18]m X[19]m
    --> pppd: ????[18][18]m X[19]m
    --> local IP address <IP>
    --> pppd: ????[18][18]m X[19]m
    --> remote IP address <IP>
    --> pppd: ????[18][18]m X[19]m
    --> primary DNS address <IP>
    --> pppd: ????[18][18]m X[19]m
    --> secondary DNS address <IP>
    --> pppd: ????[18][18]m X[19]m
    --> pppd: ????[18][18]m X[19]m
    --> pppd: ????[18][18]m X[19]m

That’s it! You must now be able to browse the Internet. In order to disconnect press Ctrl+C.

Categories
Photography Technology

Warming up your images using GIMP

Cameras allow you to adjust the white balance setting in your images, but, I prefer to have an original version with me just in case I want to experiment with the original image.

Now let’s say you want to add warmth to your images. In cameras, you would set the white-balance setting to cloudy or overcast to get this effect.

Now how do we do the same in GIMP?

Original image:

Warmed up image:

Categories
Photography Technology

Color level editing with GIMP

If you want to change that:

to that:

you need to understand something called Color Levels. The original image is overly underexposed, and the edited image has the brightness and shadows better than in the unedited image. This tutorial teaches you how to rescue such underexposed images and also how to optimize the shadows and highlights in your image.

The Color Level tool in GIMP allows you to adjust how bright or how dark you want your image to be. Many a times, we face this problem of over exposure of whole or portions of an image and we just can’t get it right with a camera (unless you are a pro)! So GIMP to the rescue.

Categories
Technology

Associating files with URLs on Ubuntu (Gnome) – a quick hack

You just downloaded a file from the Internet, for ex, a PDF, a word document from Google Docs, or a video from TED or a talk from Google Videos. You downloaded this file some days back and now, when you viewed it and wanted to know what the world is talking about it, you don’t remember where you downloaded it from and end up searching for the filename or something related to it in Google.

How many times has this happened to you? How nice would it be if it was possible to associate the file with the URL from where you downloaded it or the page associated with it?

I felt the need for this when I downloaded a lot of TED videos recently and wanted a way to go to the TED page describing the video.

I started searching for the quickest way to do it and I found out a quick way to create context menus in Gnome using Nautilus Actions. So all I had to do was to create 2 commands – one for associating the URL and the other to launch the URL. Did you know it is very simple to create contextual commands in Ubuntu Gnome?

Categories
Technology

Startup City 2009 – Event highlights

As planned, I had been to Startup City 2009 today.

I reached at 9am sharp and was surprised to see the place filled with people. I found it hard to find a parking spot and there were quite a few cars lined up because the parking was full.

I didn’t have any problems with registration as they had a separate registration counter for bloggers, press and exhibitors.

I would estimate the turn-up to be more than 3000. More than 100 startups had put up stalls in the event.

The event started with a keynote from Naukri.com founder, Sanjeev Bikhchandani.

Categories
Technology

Startup City 2009 – Be there!

SiliconIndia, India’s largest professional network, is hosting an event called Startup City on June 6th, 2009 in Bangalore NIMHANS Convention Center.

Over 100 startups and more than 40 investors plan to attend this event and showcase their products. There will be sessions from the CEO’s of Naukri, Rediff and Tejas Networks and from companies like Amazon, Sun Microsystems, Nokia etc.

As part of this event, there will be, Live product demonstrations, Visionary Keynotes, In-depth Panel Discussions etc.

This is an excellent opportunity for everyone to meet and interact with people working in or being part of interesting startups in and around the city, getting to learn from their success stories and their mistakes alike. SiliconIndia expects more than 5000 event attendees.

You can learn more about this event and register here.

Hope to see you there!